AWS to GCP site-to-site VPN 建置紀錄
AWS to GCP site-to-site VPN 建置紀錄,主要是透過這樣的建置可以很快掌握到兩座公有雲的網路架構規劃以及熟悉基本的操作,本篇主要對照的是GCP 官方網站文章 - Build HA VPN connections between Google Cloud and AWS。
其實網站上的文章寫得非常詳盡,只是裡面有部分文字容易讓我看不懂,所以就做個紀錄,以防以後我老花忘記。
通常公有雲提供 Site-to-Site VPN 的目的主要是要提供雲端對地端的 Hybrid Cloud 連接場景,對照的業務應用情境就是:
- 你有兩座 Kubernetes 要做備援,要部署 CI/CD 流水線
- 某個你想用的產品只有公有雲 A 有,但是你主要控制 CI/CD 的節點都在公有雲 B 上,你想寫腳本從公有雲 B 控制公有雲 A
我這邊沒有使用地端的環境,就把兩座公有雲環境網路打通,主要要注意的有兩點:
- 不同公有雲環境的 zone 最好要在同個地區,比方說東京就對到東京
- 網段規劃不可與其他 subnet 重疊,比方說在規劃 GCP Subnet 時,你規劃了 10.143.0.0/20,AWS 那邊就不能有重複的 subnet 也用這組網段
環境以及使用版本
先上官方的超簡易參考架構圖,主要會需要碰到的組件都有在圖裡面:
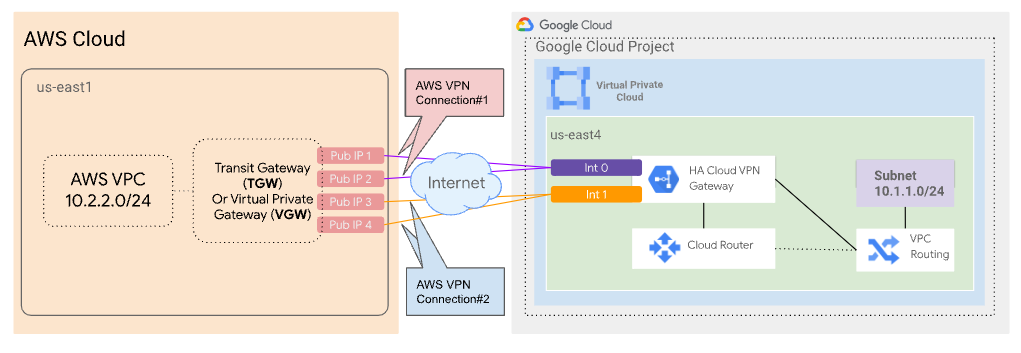
但是實際上你會需要設定這麼多東西:
- AWS Cloud
- Transit Gateway or Virtual Private Gateway (用來接收 GCP 發來的連線)
- Customer Gateway (用來發給 GCP 連線)
- Site-to-Site VPN Connections
- Route Table
- Route Table associate with subnet
- Firewall Policy
- Security Group
- GCP Gloud
- Cloud Router
- HA VPN Gateway
- VPN tunnels
- Peer VPN Gateway
除了官方網站之外,我也有參考愛卡拉的 【手把手教學】如何透過 HA VPN 連接 GCP 和 AWS VPC,這篇文章的圖解非常詳盡易懂,有需要可以交叉參考。
另外我也有買 Google 傳教士推出的參考書籍,可以更方便從零開始了解 GCP 到底有什麼樣的功能可以使用:Visualizing Google Cloud: 101 Illustrated References for Cloud Engineers and Architects 1st Edition,主要是公有雲的產品其實蠻多的,有時候腦中只有場景,不知道要用什麼搭建起一套系統的話,直接看書中的例子是比較快的。
Step by Step
以下是在 GCP cloud shell 做操作
這只是照著官網陳述的命令做操作,你可以在 local 端使用命令行,也可以使用 Terraform 建置。
- 建立獨立的 VPC
1 | gcloud compute networks create xx-vpc \ |
- 建立測試的 subnet,VPC 建置完成後都會在每個 Zone 配給預設的 subnet,但這邊我怕 IP 跟 AWS 的有衝突,所以獨立建置了 subnet,這邊記得 region 要跟 AWS 的測試機放在一樣的 Region,網路傳輸才不會繞來繞去。
1 | gcloud compute networks subnets create test-subnet \ |
- 建置 VPN Gateway,region 也要跟上面一樣
1 | gcloud compute vpn-gateways create ha-vpc-gw-test --network gc-vpc --region us-east1 |
建完之後,GCP 會配給你兩個 Interface 的 Static IP,待會會用到。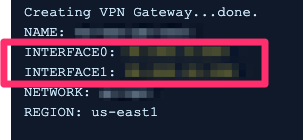
- 建置 router,這邊填寫的 asn 是 BGP 的自治系統編號,可以填入 64512 到 65535 之間的其中一個數字,這個數字待會會用到。
1 | gcloud compute routers create cloud-router \ |
以下是在 AWS 做操作
- 在 AWS 上創建 Customer Gateway,用到步驟 4 的 asn number 以及步驟 3 的兩個 interface IP
為什麼這邊會用到步驟 4 的 asn number 呢?基本上你可以看作是從 AWS 發起到 GCP 建立連線,所以要填入 GCP 方的 ASN number
1 | aws ec2 create-customer-gateway --type ipsec.1 --public-ip ${INTERFACE_0_IP_ADDRESS} --bgp-asn 65534 |
- 創建 AWS VPN Gateway (Virtual Private Gateway),這邊的 ASN 也跟步驟 4 的 ASN 範圍一樣,但是我填入與步驟 4 不同的編號
1 | aws ec2 create-vpn-gateway --type ipsec.1 --amazon-side-asn ${AWS_SIDE_ASN} |
這邊如果用 terraform 創建的話,要記得把這個 VPN Gateway 和 VPC 做 attachment。
- 建置 AWS site-to-site VPN Connection,這邊填入步驟 5 建置的 Customer Gateway ID 以及步驟 6 創建的 VPN Gateway ID
Options 是給那些有預先規劃 Shared Key 的人用的,我這邊是沒有加這個參數,讓 AWS 自動設定
1 | aws ec2 create-vpn-connection \ |
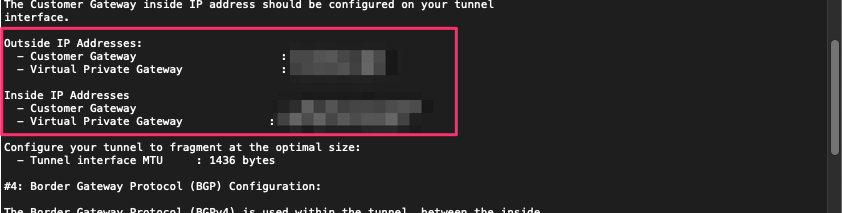
- 在 AWS Console 上下載你的 VPN Configuration File

選項照這張圖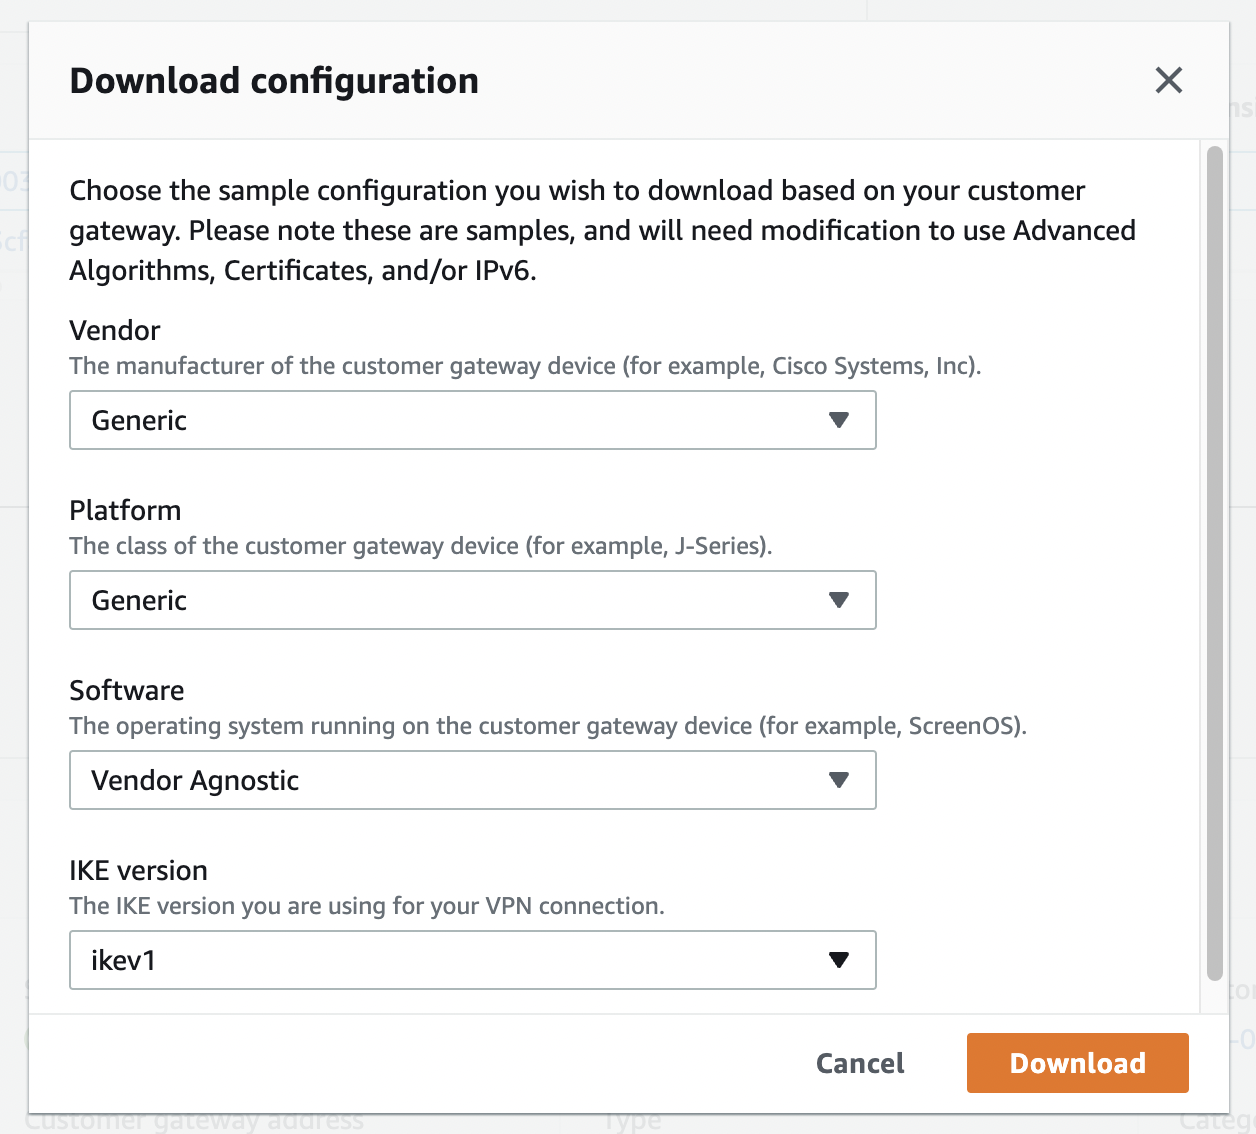
總共會有兩份設定檔案,因為你創建了兩條從 AWS 出發的 VPN 連結
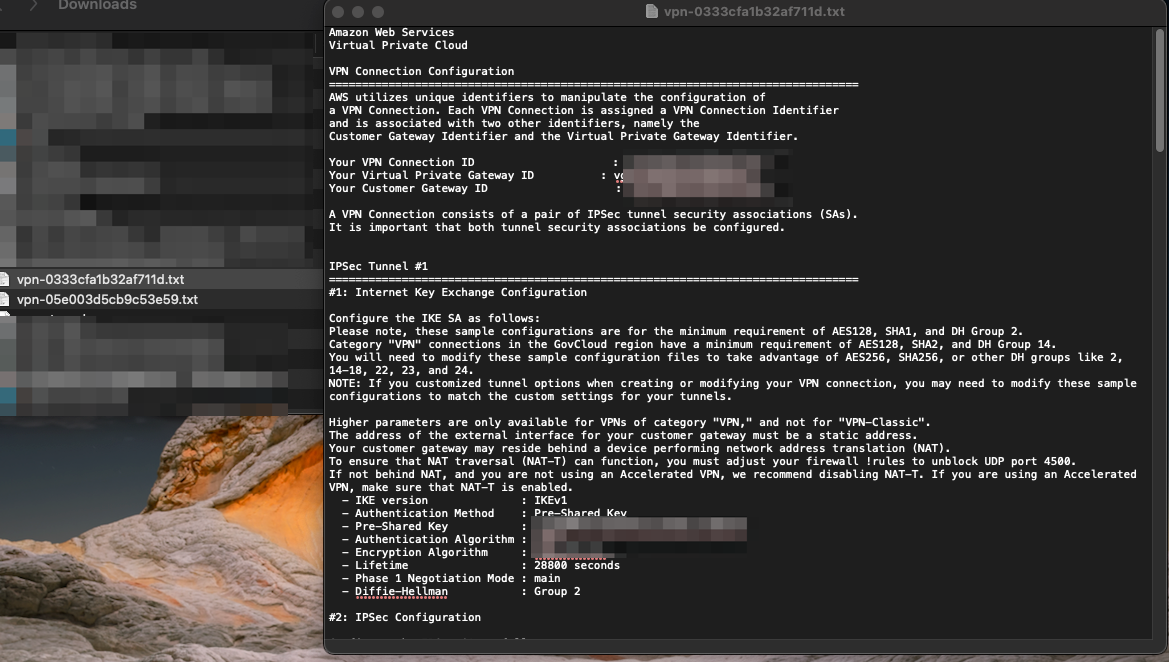
約莫拉到中間和尾端會有四個 IP,分別是 Outside IP Address 以及 Inside IP Address
每一份設定檔案會有 IPSec Tunnel #1 以及 IPSec Tunnel #2
你有兩份設定檔案,所以總共會是 4 (每個 IPSec Tunnel 的 4 個 IP addressws) * 2 個 IPSec Tunnel * 2 個 site-to-site VPN = 16 個 IP
這 16 個 IP Addresses 會再待會回到 GCP 做操作時用到,所以最好整理一下。
以下是在 GCP cloud shell 做操作
- 搭建 GCP 的 external VPN Gateway
1 | gcloud compute external-vpn-gateways create PEER_GATEWAY_NAME --interfaces \ |
- AWS_GW_IP_1: Outside IP address for virtual private gateway for connection 1, tunnel 1
- AWS_GW_IP_2: Outside IP address for virtual private gateway for connection 1, tunnel 2
- AWS_GW_IP_3: Outside IP address for virtual private gateway for connection 2, tunnel 1
- AWS_GW_IP_4: Outside IP address for virtual private gateway for connection 2, tunnel 2
- 搭建 4 條 GCP 的 VPN Tunnels,這邊的設定拿出你剛剛整理好的那 16 個 IP + AWS preshared key 的整理表照抄就行了
示意圖如下: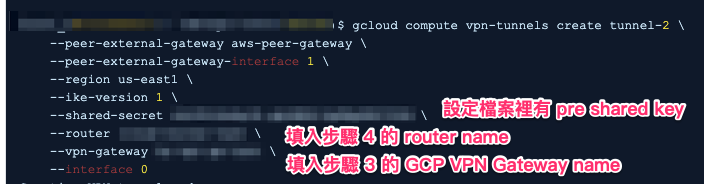
1 | gcloud compute vpn-tunnels create tunnel-1 \ |
- 添加 GCP router 的 interfaces,總共四個 interfaces,因為你有 4 條 Tunnels
我知道這邊光看 Google 官方文件還是不懂。沒關係,示意圖如下:

1 | gcloud compute routers add-interface ROUTER_NAME \ |
- 終於來到建置的最後一步,添加 GCP bgp peer,因為你有四條 Tunnels,所以這邊也要設定四次 bgp peer。
一樣有示意圖,免煩惱。

1 | gcloud compute routers add-bgp-peer ROUTER_NAME \ |
建置完的檢查
- 先確認建置列表,以及 router 的狀態
1 | gcloud compute routers get-status ROUTER_NAME \ |
- 檢查四個 tunnels 以及所對應的 peer addresses 是否都設置正確
1 | gcloud compute vpn-tunnels list |
- 檢查四個 tunnels 的狀態
這邊依序輸入 tunnel-1 到 tunnel-4。
1 | gcloud compute vpn-tunnels describe tunnel-1 \ |
- 確認動態路由的狀態
1 | gcloud compute routers get-status ${Your GCP Router Name} |
檢查機器的連通性
再來要確認 AWS EC2 可以 ping 到 GCP 的 instance。
- 首先要確認你兩邊機器的這三樣東西有被正確設定
AWS 端:
- Subnet:AWS EC2 所在網段必須要被 Associated 到某個 Route Table
- Route Table:
- 這邊要添加 GCP 對端測試機器所在 Subnet,假設 GCP 測試機器 IP 為 10.144.0.2 就要添加 10.144.0.0/20 等子網 (按照當初網路規劃設定即可)
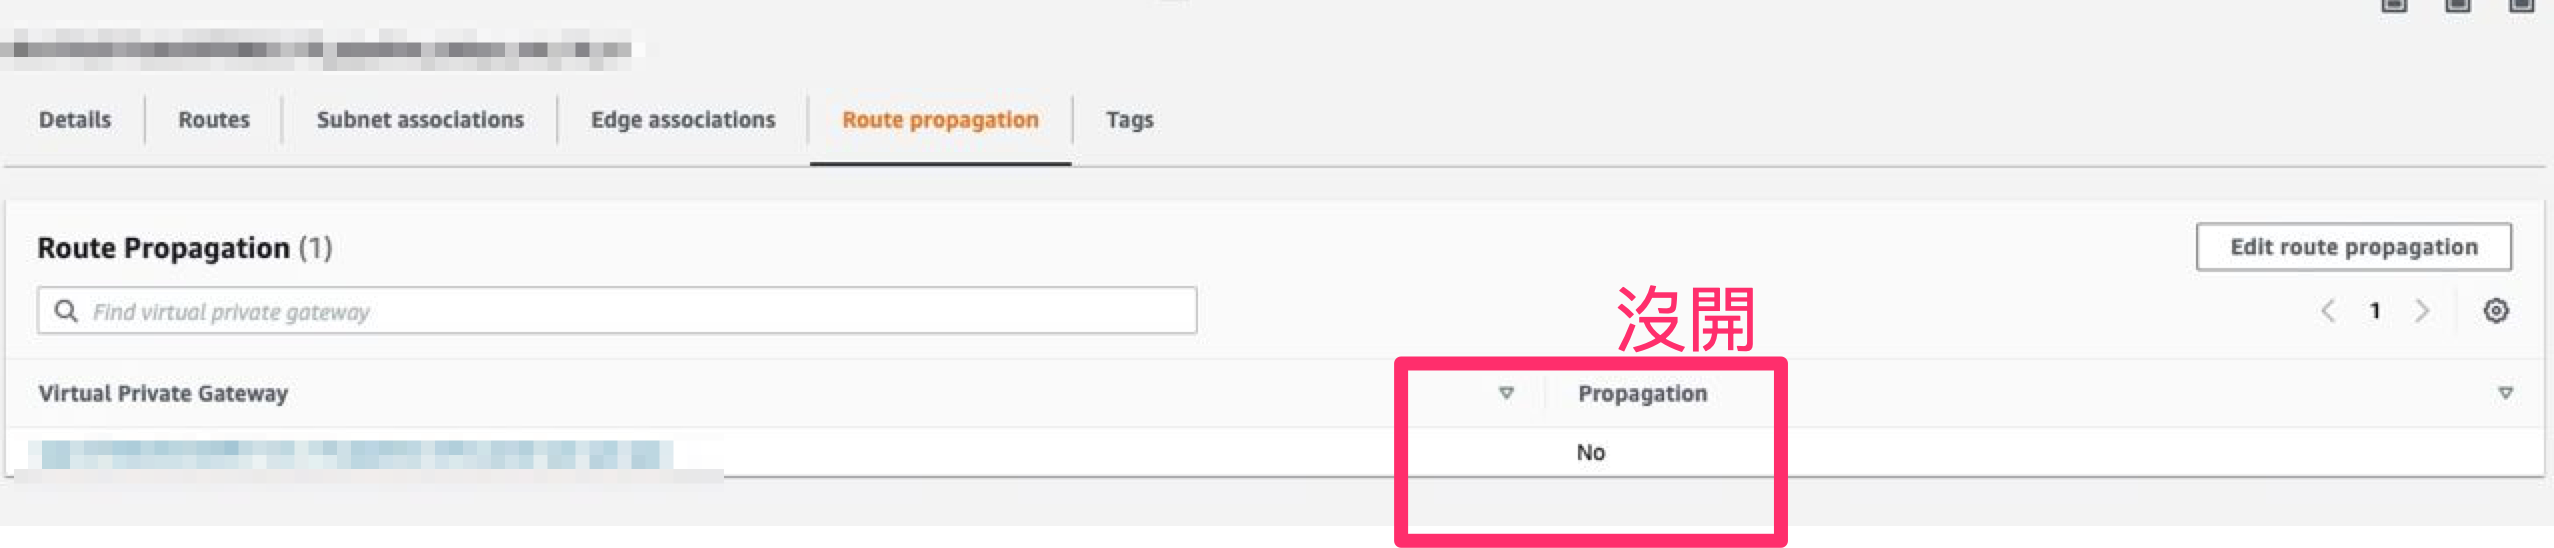
- Route Table Propagation: 這個最好要開啟,意思是指把本地的 Route 封包透過 VPN Gateway 傳到連接彼端,如果 AWS & GCP 網段地址沒有重複的話沒開是沒關係的,但是保險起見最好還是開啟。(我是沒開啦,但網段沒重複還是可用)
- Firewall Rule: Outbound 至少要可以打到 10.144.0.2
GCP 端:
- Firewall Rule 示意圖:
![upload successful]()

- 接下來使用 ping 發送 ICMP 封包進行測試
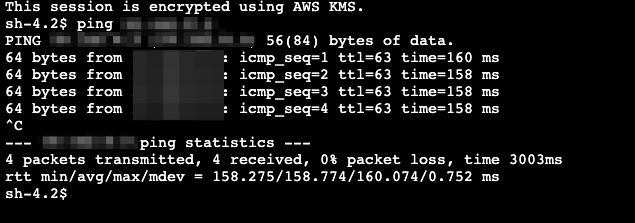
通了~ 可喜可賀~
Reference
🍀 Build HA VPN connections between Google Cloud and AWS
🍀 【手把手教學】如何透過 HA VPN 連接 GCP 和 AWS VPC
🍀 Visualizing Google Cloud: 101 Illustrated References for Cloud Engineers and Architects 1st Edition
🍀 ASN 的定義