在 OpenShift 4.20 上建置模型服務:vLLM + Qwen 3 8B + Open WebUI

OpenWeb_AI_Service.png

去年我在 2025 iTHome 鐵人賽 - 30 天帶你實戰 LLMOps:從 RAG 到觀測與部署Day17 - LLM 部署策略選型:雲端 vs 本地 vs 混合架構(成本與隱私) 有介紹過雲地部署 AI 模型大略的成本概念。所以我也想實際在我的地端環境裡面簡單的建置看看大語言模型服務,走過一遍實際的建置流程,才會有深刻的印象。

適用環境:RHEL 9 / OpenShift 4.20 / RTX PRO 4000 Blackwell GPU

我的環境建置成本和選型可以參考這篇:Homelab 神桌 2.0 建置紀錄


規劃

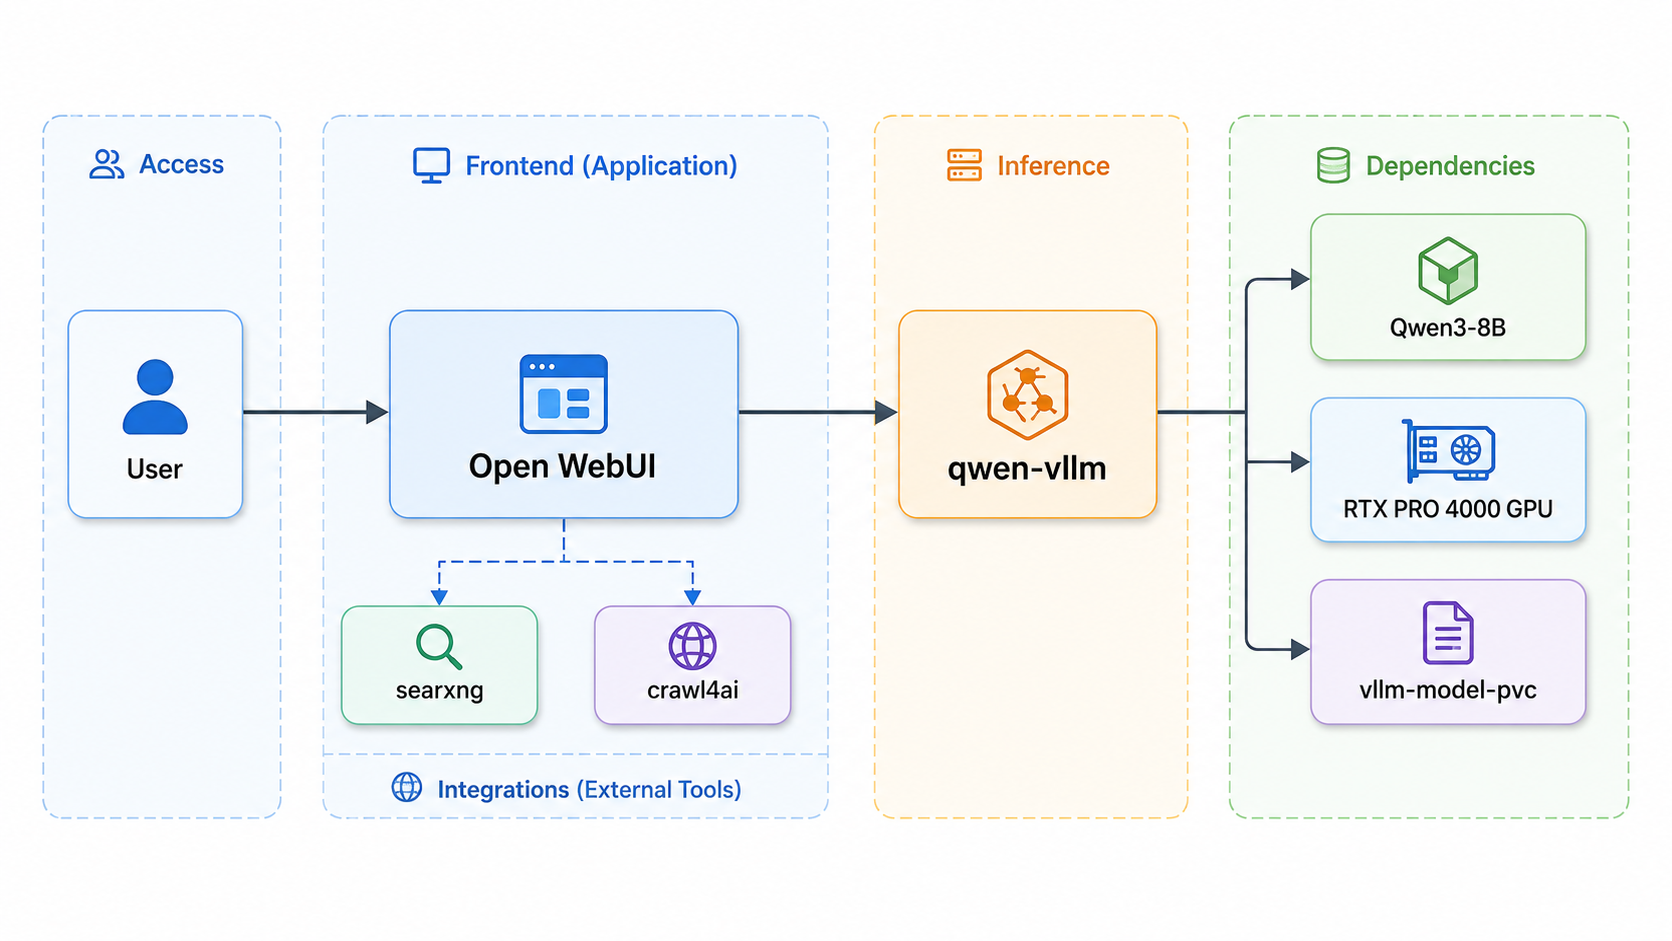
如封面圖所示,我們必須建置給使用者輸入對話的 Open WebUI 入口、輔以 searxngcrawl4ai 作為網路查詢資料用途、後端使用 vLLM 作為模型的部署工具,讓模型可以作為大腦提供思考能力。假設環境裡有多個 vLLMdeployments 部署, Open Web UI 可以提供使用者自由選擇不同的模型,當然也可以串接 AI AgentMCP

為何選擇 Open WebUI?

因為建置的時候我是比較常用 ChatGPT, 而且這個 Portal 專案可以模擬多人使用情境新增不同使用者、控制使用者權限、限制哪些模型可以開放,算是模擬企業情境很好用的專案。

OpenWebUI-User admin

可能你也會有疑問,為什麼不是選擇最常聽到的 Ollama ,而是選擇 vLLM 作為部署的選擇?

以我的環境來說,我不只想在自己電腦上跑模型,還要在 OpenShift 裡面把模型變成一個可被 Open WebUI 呼叫、監控、調度的服務,重點是必須要模擬多人使用者、多併發需求的 Production 場景。本文聚焦在 OpenShift 上部署可觀測、可調校的 LLM inference service,因此選擇 vLLM作為推論引擎。若你的需求是快速在OpenShift上跑起一個LLM + Open WebUIOllama 也是可行的選擇。

以下是簡易比較表:

Ollama vLLM
核心定位 易用的本地 / 私有 LLM runtime 高吞吐、記憶體效率佳的 LLM inference serving engine
Kubernetes / OpenShift 可透過 Ollama Operator 部署與管理,已有 Kubernetes / OpenShift 實作與教學 天生更常被用在模型服務化、高併發推論、MLOps / AI platform 場景
使用體驗 上手簡單,適合快速拉模型、測模型、接 Open WebUI 需要理解 serving 參數、GPU 記憶體、KV cache、batching、模型格式
模型格式 主要使用 Ollama model / GGUF 生態,也可透過Modelfile 匯入模型 主要使用 Hugging Face model repo,預設優先載入 safetensors,沒有才 fallback 到 PyTorch bin
模型相容性 Ollama 模型與 vLLM 模型不能直接互通;若是自訂或微調模型,常需要轉換或建立Modelfile 只要是 vLLM 原生支援、Transformers-compatible,或能透過 custom model/remote code 載入,就比較直接
自訂模型 可以做,但通常要處理 GGUF / Modelfile / adapter 匯入流程 對 Hugging Face / Transformers 格式的自訂模型比較自然
效能導向 易用、離線、本地體驗優先 Throughput、continuous batching、PagedAttention、GPU utilization 優先
適合場景 個人開發、內部小型服務、PoC、local-first LLM、快速 Demo 多人共用、高流量 API、平台化部署、正式 inference endpoint

一:vLLM 推論引擎部署

這邊會需要調查一下 GPU 適合使用的模型。因為我的 GPU 只有少少的 24 GB vRAM,如果選擇過大的模型(比方說 DeepSeek-R1-Distill-Qwen-32B)模型可能根本載不起來;就算勉強載起來,也會因為 KV cache 空間不足,導致 context 長度、並發能力、表現的穩定性都大幅下降。

比方說以 32B 模型來說,如果用 BF16 / FP16,光模型權重大約就是:

1
32B parameters × 2 bytes ≈ 64GB

這邊還沒有算上 CUDA / PyTorch runtime overheadvLLM engine overheadactivation / temporary bufferKV cacheCUDA graph / compile cachefragmentation 等 vRAM 開銷,直接啟動可能就會遇到 CUDA out of memory 的錯誤。就算勉強選用達到 vRAM 上限的模型,也會因為 KV cache 不足導致吞吐量較低、模型上下文變短、更甚者會跑到一半就 OOM。不過跑不起來不是模型的問題,\\x7e\x7e是我錢包的問題\x7e~。

Deployment 核心配置(qwen-vllm-deployment.yaml

1
2
3
4
5
6
7
8
9
10
11
12
13
14
15
16
17
18
19
20
21
22
23
24
25
26
27
28
29
30
31
32
33
34
35
36
37
38
39
40
41
42
43
44
45
46
47
48
49
50
51
52
53
54
55
56
57
58
59
60
61
62
63
apiVersion: apps/v1
kind: Deployment
metadata:
name: qwen-vllm
namespace: llm-inference
spec:
replicas: 1
strategy:
type: Recreate
selector:
matchLabels:
app: qwen-vllm
template:
metadata:
labels:
app: qwen-vllm
spec:
nodeSelector:
accelerator: nvidia-gpu
containers:
- name: vllm-engine
image: docker.io/vllm/vllm-openai:v0.8.5.post1
imagePullPolicy: IfNotPresent
command: ["vllm", "serve"]
args:
- "Qwen/Qwen3-8B"
- "--dtype"
- "bfloat16" # 不要量化,保留品質
- "--max-model-len"
- "32768" # 模型的單次對話上下文上限
- "--gpu-memory-utilization"
- "0.90" # 這邊我設置九成的使用率,留一點給額外的 vRAM 花銷
- "--trust-remote-code"
- "--allowed-origins"
- '["*"]'
env:
- name: HOME
value: "/vllm-data"
- name: HF_HOME
value: "/vllm-data/.cache/huggingface"
- name: FLASHINFER_WORKSPACE_DIR
value: "/vllm-data/.cache/flashinfer"
# 讓 container 裡的 vLLM / Hugging Face library 用你的 Hugging Face 帳號身分去下載模型。
- name: HF_TOKEN
valueFrom:
secretKeyRef:
name: hf-token
key: token
ports:
- containerPort: 8000
name: http
resources:
requests:
nvidia.com/gpu: "1" # 確保 GPU Operator 正確調度,這邊我的卡是用 passthrough 的方式直接綁定一台 worker node, 意思就是 pod 會完全吃掉一張完整的卡。
limits:
nvidia.com/gpu: "1"
volumeMounts:
- name: model-data
mountPath: /vllm-data
volumes:
- name: model-data
persistentVolumeClaim:
claimName: vllm-model-pvc # 指向 lvms-local-vg 存儲

部署指令

1
2
3
4
5
# 部署 vLLM (第一次 pulling 會花很久的時間)
oc apply -f qwen-vllm-deployment.yaml

# 監控 CUDA Graph 捕捉與權重載入
oc logs -f deployment/qwen-vllm -n llm-inference

pod 跑起來,成功進入 vLLM engine 初始化階段 log 如下:

1
2
3
4
5
6
7
8
9
10
11
12
13
14
15
16
17
18
19
20
21
22
23
24
25
26
27
28
29
30
31
32
33
34
35
36
37
38
39
40
41
42
43
44
45
46
47
48
49
50
51
52
53
54
55
56
57
58
59
60
61
62
63
64
65
66
67
68
69
70
# 這代表 vLLM 找得到 GPU,也認得 Qwen3-8B。
(APIServer pid=1) INFO 06-04 16:54:41 [utils.py:344]
(APIServer pid=1) INFO 06-04 16:54:41 [utils.py:344] █ █ █▄ ▄█
(APIServer pid=1) INFO 06-04 16:54:41 [utils.py:344] ▄▄ ▄█ █ █ █ ▀▄▀ █ version 0.22.0
(APIServer pid=1) INFO 06-04 16:54:41 [utils.py:344] █▄█▀ █ █ █ █ model Qwen/Qwen3-8B
(APIServer pid=1) INFO 06-04 16:54:41 [utils.py:344] ▀▀ ▀▀▀▀▀ ▀▀▀▀▀ ▀ ▀
(APIServer pid=1) INFO 06-04 16:54:41 [utils.py:344]
(APIServer pid=1) INFO 06-04 16:54:41 [utils.py:278] non-default args: {'model_tag': 'Qwen/Qwen3-8B', 'model': 'Qwen/Qwen3-8B', 'trust_remote_code': True, 'dtype': 'bfloat16', 'max_model_len': 32768, 'gpu_memory_utilization': 0.9}
(APIServer pid=1) WARNING 06-04 16:54:41 [envs.py:2057] Unknown vLLM environment variable detected: VLLM_BUILD_COMMIT
(APIServer pid=1) WARNING 06-04 16:54:41 [envs.py:2057] Unknown vLLM environment variable detected: VLLM_BUILD_PIPELINE
(APIServer pid=1) WARNING 06-04 16:54:41 [envs.py:2057] Unknown vLLM environment variable detected: VLLM_BUILD_URL
(APIServer pid=1) WARNING 06-04 16:54:41 [envs.py:2057] Unknown vLLM environment variable detected: VLLM_IMAGE_TAG
(APIServer pid=1) Warning: You are sending unauthenticated requests to the HF Hub. Please set a HF_TOKEN to enable higher rate limits and faster downloads.
(APIServer pid=1) INFO 06-04 16:54:58 [model.py:617] Resolved architecture: Qwen3ForCausalLM
(APIServer pid=1) INFO 06-04 16:54:58 [model.py:1752] Using max model len 32768
(APIServer pid=1) INFO 06-04 16:54:58 [vllm.py:977] Asynchronous scheduling is enabled.
(APIServer pid=1) INFO 06-04 16:54:58 [kernel.py:270] Final IR op priority after setting platform defaults: IrOpPriorityConfig(rms_norm=['native'], fused_add_rms_norm=['native'])
(EngineCore pid=94) INFO 06-04 16:55:11 [core.py:112] Initializing a V1 LLM engine (v0.22.0) with config: model='Qwen/Qwen3-8B', speculative_config=None, tokenizer='Qwen/Qwen3-8B', skip_tokenizer_init=False, tokenizer_mode=auto, revision=None, tokenizer_revision=None, trust_remote_code=True, dtype=torch.bfloat16, max_seq_len=32768, download_dir=None, load_format=auto, tensor_parallel_size=1, pipeline_parallel_size=1, data_parallel_size=1, decode_context_parallel_size=1, dcp_comm_backend=ag_rs, disable_custom_all_reduce=False, quantization=None, quantization_config=None, enforce_eager=False, enable_return_routed_experts=False, kv_cache_dtype=auto, device_config=cuda, structured_outputs_config=StructuredOutputsConfig(backend='auto', disable_any_whitespace=False, disable_additional_properties=False, reasoning_parser='', reasoning_parser_plugin='', enable_in_reasoning=False), observability_config=ObservabilityConfig(show_hidden_metrics_for_version=None, otlp_traces_endpoint=None, collect_detailed_traces=None, ...
(EngineCore pid=94) INFO 06-04 16:55:13 [parallel_state.py:1422] world_size=1 rank=0 local_rank=0 distributed_init_method=tcp://10.131.0.43:38809 backend=nccl
(EngineCore pid=94) INFO 06-04 16:55:13 [parallel_state.py:1735] rank 0 in world size 1 is assigned as DP rank 0, PP rank 0, PCP rank 0, TP rank 0, EP rank N/A, EPLB rank N/A
(EngineCore pid=94) INFO 06-04 16:55:13 [gpu_worker.py:289] Using V2 Model Runner
# vLLM 的 engine 正在初始化模型權重
(EngineCore pid=94) INFO 06-04 16:55:14 [model_runner.py:274] Loading model from scratch...
(EngineCore pid=94) INFO 06-04 16:55:14 [cuda.py:378] Using FLASH_ATTN attention backend out of potential backends: ['FLASH_ATTN', 'FLASHINFER', 'TRITON_ATTN', 'FLEX_ATTENTION'].
(EngineCore pid=94) INFO 06-04 16:55:14 [flash_attn.py:636] Using FlashAttention version 2
# 這邊改用 HF_TOKEN 表較快
(EngineCore pid=94) Warning: You are sending unauthenticated requests to the HF Hub. Please set a HF_TOKEN to enable higher rate limits and faster downloads.

# 權重實際載入 GPU 花了 15.27 GiB VRAM
# 從下載 / 讀 cache / load 完整模型總共花了 1020 秒 ≈ 17 分鐘
(EngineCore pid=63) INFO 06-04 17:29:16 [weight_utils.py:603] Time spent downloading weights for Qwen/Qwen3-8B: 1013.624420 seconds
(EngineCore pid=63) INFO 06-04 17:29:17 [weight_utils.py:922] Filesystem type for checkpoints: XFS. Checkpoint size: 15.26 GiB. Available RAM: 21.46 GiB.
(EngineCore pid=63) INFO 06-04 17:29:17 [weight_utils.py:945] Auto-prefetch is disabled because the filesystem (XFS) is not a recognized network FS (NFS/Lustre). If you want to force prefetching, start vLLM with --safetensors-load-strategy=prefetch.
(EngineCore pid=63) Loading safetensors checkpoint shards: 0% Completed | 0/5 [00:00<?, ?it/s]
(EngineCore pid=63) Loading safetensors checkpoint shards: 20% Completed | 1/5 [00:00<00:02, 1.67it/s]
(EngineCore pid=63) Loading safetensors checkpoint shards: 40% Completed | 2/5 [00:01<00:02, 1.42it/s]
(EngineCore pid=63) Loading safetensors checkpoint shards: 60% Completed | 3/5 [00:01<00:01, 1.55it/s]
(EngineCore pid=63) Loading safetensors checkpoint shards: 80% Completed | 4/5 [00:02<00:00, 1.43it/s]
(EngineCore pid=63) Loading safetensors checkpoint shards: 100% Completed | 5/5 [00:03<00:00, 1.67it/s]
(EngineCore pid=63) Loading safetensors checkpoint shards: 100% Completed | 5/5 [00:03<00:00, 1.59it/s]
(EngineCore pid=63)
(EngineCore pid=63) INFO 06-04 17:29:20 [default_loader.py:397] Loading weights took 3.17 seconds
(EngineCore pid=63) INFO 06-04 17:29:21 [model_runner.py:295] Model loading took 15.27 GiB and 1020.771076 seconds
(EngineCore pid=63) INFO 06-04 17:29:28 [backends.py:1089] Using cache directory: /vllm-data/.cache/vllm/torch_compile_cache/7b9e198267/rank_0_0/backbone for vLLM's torch.compile
(EngineCore pid=63) INFO 06-04 17:29:28 [backends.py:1148] Dynamo bytecode transform time: 7.43 s
(EngineCore pid=63) INFO 06-04 17:29:34 [backends.py:378] Cache the graph of compile range (1, 2048) for later use
(EngineCore pid=63) INFO 06-04 17:29:38 [backends.py:393] Compiling a graph for compile range (1, 2048) takes 9.84 s
(EngineCore pid=63) INFO 06-04 17:29:41 [decorators.py:708] saved AOT compiled function to /vllm-data/.cache/vllm/torch_compile_cache/torch_aot_compile/0473191006d2a3adef448fef3a7c59ebf062e92679a28ccb078f6fd60a2ecde2/rank_0_0/model
(EngineCore pid=63) INFO 06-04 17:29:41 [monitor.py:53] torch.compile took 20.50 s in total
(EngineCore pid=63) INFO 06-04 17:29:42 [monitor.py:81] Initial profiling/warmup run took 1.02 s

(EngineCore pid=63) INFO 06-04 17:29:44 [gpu_worker.py:466] Available KV cache memory: 4.51 GiB
(EngineCore pid=63) INFO 06-04 17:29:44 [kv_cache_utils.py:1733] GPU KV cache size: 32,816 tokens
(EngineCore pid=63) INFO 06-04 17:29:44 [kv_cache_utils.py:1734] Maximum concurrency for 32,768 tokens per request: 1.00x
# 代表 FlashInfer 正在做 kernel autotuning,幫不同 shape 找比較快的執行方式。第一次啟動會花一些時間
(EngineCore pid=63) 2026-06-04 17:29:44,565 - INFO - autotuner.py:615 - flashinfer.jit: [Autotuner]: Autotuning process starts ...
(EngineCore pid=63) 2026-06-04 17:30:12,823 - INFO - autotuner.py:634 - flashinfer.jit: [Autotuner]: Autotuning process ends
...
...
# Qwen/Qwen3-8B 已經載入完成
Starting vLLM server on http://0.0.0.0:8000
...
...
# vLLM API server 已經起來
Route: /v1/chat/completions, Methods: POST
Route: /v1/models, Methods: GET
...
...
# OpenAI-compatible API 可以用了
Application startup complete.

從映像檔下載到跑起來所花費的時間

階段 第一次啟動可能時間
Pull vllm-openai image 5–15 分鐘,慢的話更久
下載 Qwen/Qwen3-8B 模型 10–40 分鐘,看網路
載入模型到 GPU 1–5 分鐘
建 KV cache / CUDA graph 1–5 分鐘
總時間 大概 15–60 分鐘

vLLM Log 解讀

以下以實際運行約 5 分鐘(17:35–17:40)的日誌為例,說明各項指標的意義與觀察結果。從這段日誌可以看到屬於輕負載情境,GPU 仍有大量餘裕。若要測試系統上限,可嘗試提高並行請求數量。

1
2
3
4
5
6
7
8
(APIServer pid=1) INFO 06-04 17:39:54 [loggers.py:271] Engine 000: Avg prompt throughput: 16.3 tokens/s, Avg generation throughput: 38.0 tokens/s, Running: 1 reqs, Waiting: 0 reqs, GPU KV cache usage: 3.7%, Prefix cache hit rate: 26.4%
(APIServer pid=1) INFO 06-04 17:40:04 [loggers.py:271] Engine 000: Avg prompt throughput: 88.6 tokens/s, Avg generation throughput: 37.2 tokens/s, Running: 1 reqs, Waiting: 0 reqs, GPU KV cache usage: 4.1%, Prefix cache hit rate: 25.6%
(APIServer pid=1) INFO 06-04 17:40:14 [loggers.py:271] Engine 000: Avg prompt throughput: 2.2 tokens/s, Avg generation throughput: 48.4 tokens/s, Running: 2 reqs, Waiting: 0 reqs, GPU KV cache usage: 6.6%, Prefix cache hit rate: 27.7%
(APIServer pid=1) INFO: 10.128.2.8:46440 - "POST /v1/chat/completions HTTP/1.1" 200 OK
(APIServer pid=1) INFO: 10.128.2.8:59356 - "POST /v1/chat/completions HTTP/1.1" 200 OK
(APIServer pid=1) INFO 06-04 17:40:24 [loggers.py:271] Engine 000: Avg prompt throughput: 0.0 tokens/s, Avg generation throughput: 17.7 tokens/s, Running: 0 reqs, Waiting: 0 reqs, GPU KV cache usage: 0.0%, Prefix cache hit rate: 27.7%
(APIServer pid=1) INFO 06-04 17:40:34 [loggers.py:271] Engine 000: Avg prompt throughput: 0.0 tokens/s, Avg generation throughput: 0.0 tokens/s, Running: 0 reqs, Waiting: 0 reqs, GPU KV cache usage: 0.0%, Prefix cache hit rate: 27.7%
(APIServer pid=1) INFO: 10.128.2.8:40714 - "POST /v1/chat/completions HTTP/1.1" 200 OK

吞吐量

Generation throughput 全程穩定維持在約 37–38 tokens/s,反映 GPU 生成速度固定。Prompt throughput 變動較大(0–338 tokens/s),主要受 prefix cache 命中率影響:命中時不需重新計算,速度會明顯提升。出現並行請求時,generation throughput 可提升至 60 tokens/s。

GPU KV Cache

使用率大多維持在 1–8%,最高僅 16.2%(發生於並行請求時),每次請求結束後自動歸零。

Prefix Cache Hit Rate

時間 Hit Rate
17:35–17:36 0.0%(冷啟動)
17:37:14 1.1%
17:38:14 16.8%
17:39:34 36.5%(最高)
17:40:34 27.7%

Hit rate 隨請求累積逐漸上升,代表重複的 prompt prefix(例如固定的 system prompt)持續被 cache 命中,有效降低後續請求的計算成本。


二:網路連線與服務發現

建立 ClusterIP Service

1
2
3
4
5
6
7
8
9
10
11
12
13
14
oc apply -f - <<EOF
apiVersion: v1
kind: Service
metadata:
name: qwen-service
namespace: llm-inference
spec:
selector:
app: qwen-vllm
ports:
- name: http
port: 8000
targetPort: 8000
EOF

連通性驗證

1
2
3
4
5
# 確認 Endpoints 已掛載(應顯示 Pod IP)
oc get endpoints qwen-service -n llm-inference

# 從前端 Pod 測試 API 回應
oc exec -it deployment/open-webui -n llm-inference -- curl http://qwen-service:8000/v1/models

三:Open WebUI 前端部署

注入環境變數

1
2
3
4
5
oc set env deployment/open-webui \
OPENAI_API_BASE_URL="http://qwen-service:8000/v1" \
WEBUI_SECRET_KEY="<replace-with-your-secret>" \
DATA_DIR="/app/backend/data" \
-n llm-inference

取得外部存取網址,加上網路搜尋引擎以及爬蟲

1
oc get route chat-ai -n llm-inference

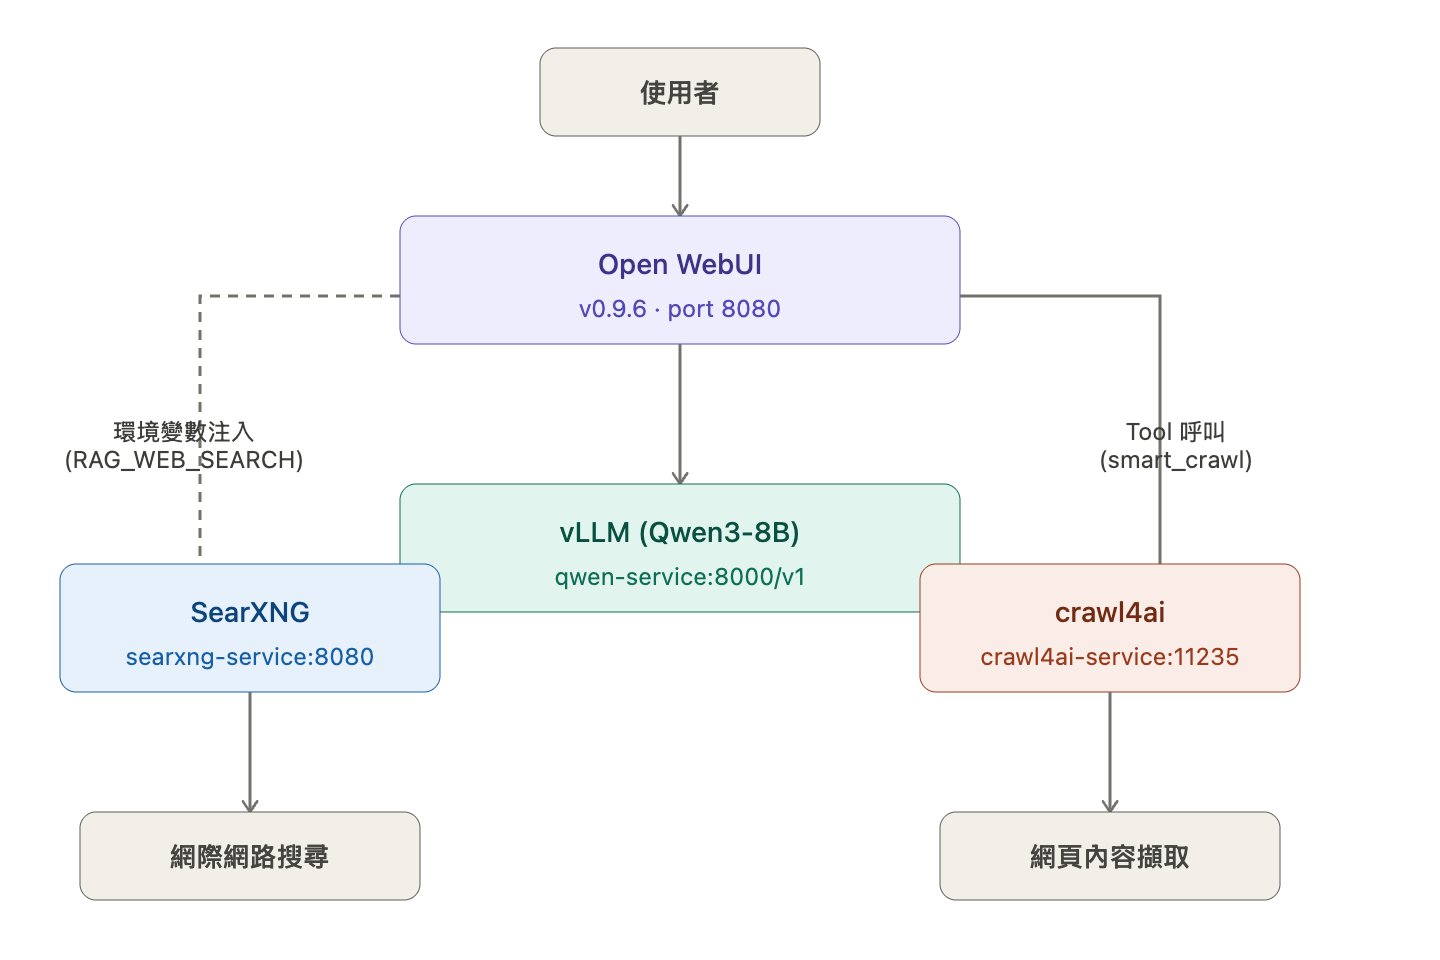
之後就可以開始對話、並進行測試。我這邊有放上搜尋引擎和爬蟲程式協助我連到外網抓取股價或是天氣等常見資訊:

  • crawl4ai — 網頁爬蟲與內容擷取工具,專為 AI 應用設計。可以把網頁內容轉成乾淨的 markdown 或結構化資料,方便直接餵給 LLM 使用。常見用途是 RAG pipeline 的資料來源、網頁內容摘要、或讓 AI agent 瀏覽網頁。
  • searxng — 開源的自架搜尋引擎,可以聚合 Google、Bing、DuckDuckGo 等多個搜尋引擎的結果,但不追蹤使用者。在 AI 場景裡常被用來給 LLM 提供即時網路搜尋能力,是 Open WebUI 等工具的常見搭配。

openwebui_tools.png

crawl4ai

我在同個 namespace 下面部署了 crawl4ai Deployment。這是跑在 cluster 裡的爬蟲服務,提供 REST API 給 Open WebUI 裡面的 LLM 呼叫 crawl4ai API 的 Tool 使用。以下是該 Tool 的程式碼:

1
2
3
4
5
6
7
8
9
10
11
12
13
14
15
16
17
18
19
20
21
22
23
24
25
26
27
28
29
30
31
32
33
34
35
36
37
38
39
40
41
42
43
44
45
46
47
48
49
50
51
52
53
54
55
56
57
58
59
import requests
import json


class Tools:
def __init__(self):
# 確保網址正確,結尾要有 /crawl
self.api_url = (
"http://crawl4ai-service.llm-inference.svc.cluster.local:11235/crawl"
)
self.token = "hazel-sre-token"

def smart_crawl(self, url: str) -> str:
"""
使用 Crawl4AI 抓取網頁並轉換為 Markdown。
:param url: 要爬取的網址
"""
# 強制將 url 封裝進 list,解決之前的 list_type 錯誤
payload = {
"urls": [url],
"priority": 10,
"crawler_params": {
"headless": True,
"magic_mode": True,
"bypass_cache": True,
},
"extraction_config": {
"type": "css",
"params": {
"selector": ".info-lp", # 這是鉅亨網股價區塊的常見 class
"attributes": ["text"],
},
},
}
headers = {"Authorization": f"Bearer {self.token}"}

try:
response = requests.post(
self.api_url, json=payload, headers=headers, timeout=60
)
response.raise_for_status() # 如果 4xx 或 5xx 就拋出異常

data = response.json()

# 嚴格檢查 API 回傳結構
if "results" in data and len(data["results"]) > 0:
markdown_content = data["results"][0].get("markdown", "")
if markdown_content:
# 成功拿到資料,回傳前 15000 個字元
return str(markdown_content)[:15000]
else:
return "抓取成功,但該網頁沒有可提取的文字內容。"

# 如果 API 回傳了錯誤訊息(如之前看到的 detail)
return f"API 回傳異常格式: {json.dumps(data, ensure_ascii=False)}"

except Exception as e:
# 捕獲所有網路或解析錯誤,並以字串形式回傳給模型
return f"SRE 診斷 - 抓取失敗: {str(e)}"

Searxng

Searxng 直接起一個 DeploymentService,並且 Open WebUI 用環境的變數指到內部 Service URL,就可以在 Open WebUI 裡面直接開啟搜尋功能。

1
2
3
4
5
6
7
8
9
10
- name: ENABLE_RAG_WEB_SEARCH
value: 'True'
- name: SEARXNG_QUERY_URL
value: 'http://searxng-service:8080/search'
- name: RAG_WEB_SEARCH_ENGINE
value: searxng
- name: RAG_WEB_SEARCH_RESULT_COUNT
value: '5'
- name: RAG_WEB_SEARCH_CONCURRENT_REQUESTS
value: '10'

四:GPU 效能監控與壓力測試

即時監控指令

1
2
3
4
5
# 持續監控顯存、功耗、溫度(Blackwell): 每五秒顯示一次
oc exec -it -n nvidia-gpu-operator nvidia-driver-daemonset-9.6.20260303-1-p4qxl -- nvidia-smi -l 5

# CPU 資源佔用
oc adm top pod -n llm-inference

實測數據

這邊用之前測試的 Qwen 2.5 7B @ 32K Context 作為範例,因為我測試過不同的模型其實在 GPU 上面的指標表現都差不多,都會超過八十度C、也幾乎都會吃滿算力,這邊就是實測時的欄位說明。

1
2
3
4
5
6
7
8
9
10
11
12
13
14
15
16
17
18
19
+-----------------------------------------------------------------------------------------+
| Processes: |
| GPU GI CI PID Type Process name GPU Memory |
| ID ID Usage |
|=========================================================================================|
| 0 N/A N/A 84303 C VLLM::EngineCore 22260MiB |
+-----------------------------------------------------------------------------------------+
Thu Mar 19 07:55:37 2026
+-----------------------------------------------------------------------------------------+
| NVIDIA-SMI 580.105.08 Driver Version: 580.105.08 CUDA Version: 13.0 |
+-----------------------------------------+------------------------+----------------------+
| GPU Name Persistence-M | Bus-Id Disp.A | Volatile Uncorr. ECC |
| Fan Temp Perf Pwr:Usage/Cap | Memory-Usage | GPU-Util Compute M. |
| | | MIG M. |
|=========================================+========================+======================|
| 0 NVIDIA RTX PRO 4000 Blac... On | 00000000:03:00.0 Off | Off |
| 53% 81C P1 144W / 145W | 22270MiB / 24467MiB | 100% Default |
| | | N/A |
+-----------------------------------------+------------------------+----------------------+

數據解讀:

  • 顯存(VRAM): 22,270 MiB / 24,467 MiB,使用率約 91%,符合 --gpu-memory-utilization 0.90 設定,剩餘 buffer 供 KV Cache 動態分配。
  • 功耗: 144W / 145W,幾乎頂到 TDP 上限,說明 Blackwell 在 AWQ 量化推論下仍能充分榨取算力,並非功耗受限瓶頸。
  • 溫度: 81°C,風扇轉速 53%。RTX PRO 系列 Tj Max 為 90°C,仍有約 9°C 熱餘量,散熱表現健康。
  • GPU 使用率: 100%,推論期間 GPU 無閒置,為純運算瓶頸(compute-bound),而非 I/O 或記憶體頻寬瓶頸。
  • 執行程序: VLLM::EngineCore(PID 84303),確認 vLLM 獨佔 GPU,無其他進程搶占資源。
  • CUDA 版本: 13.0,驅動版本 580.105.08,為支援 Blackwell 架構的最新驅動分支。

五:使用者管理與權限

已解決問題: 新註冊使用者無法看到模型。

  1. 啟用帳號: Admin PanelUsers → 將狀態從 Pending 改為 Active
  2. 公開模型: WorkspaceModels → 確認 Qwen 模型可見性設為 Global

結果展示

如圖所示,除了文字對話之外,也可以產出基本的流程圖。就地端迷你模型(8B)而言,算是非常強的表現了:

openwebui.png

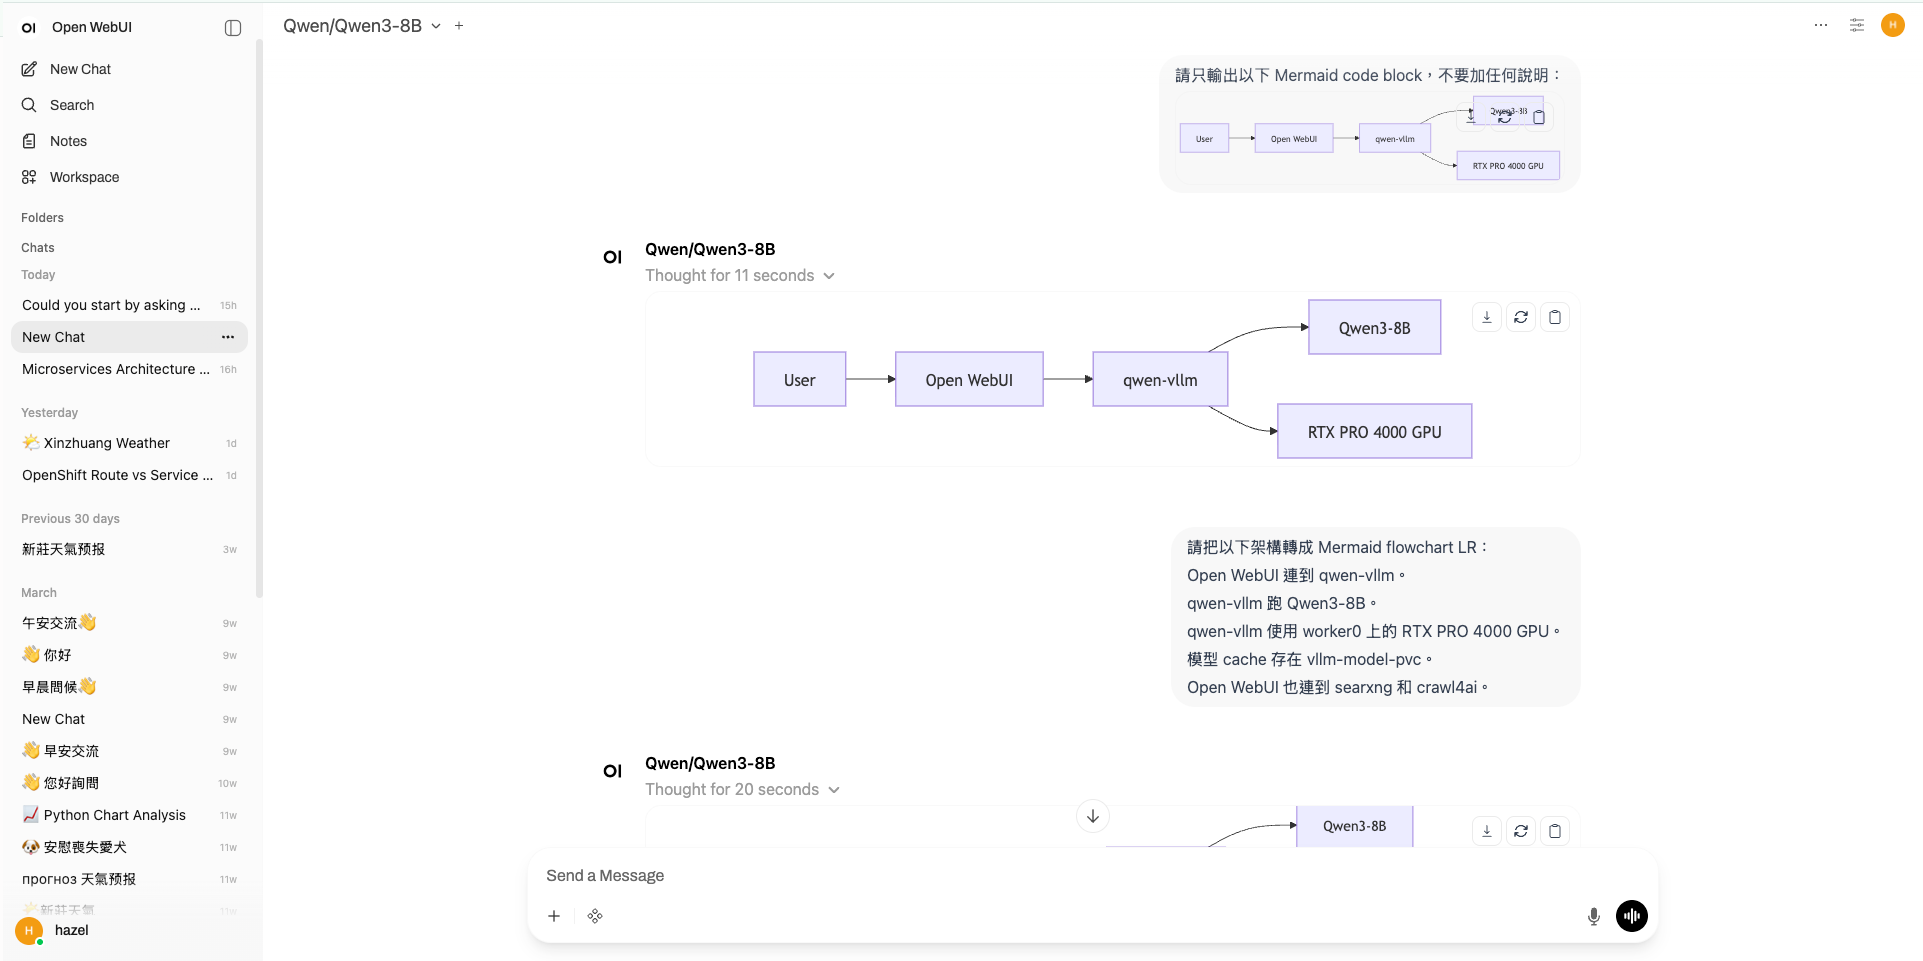
我有試過 Qwen2.5-7B,但對話測試結果實在太落漆。雖然我沒有深入研究模型之間的差異性,但就體感上來說換成 Qwen3-8B 結果好超多!我稍微查了一下原因:

Qwen3-8B 有 thinking mode,Qwen2.5-7B 沒有。 Qwen3 在同一個模型裡支援 thinking / non-thinking 切換,對於技術問題、架構分析、YAML 除錯這類需要多步推理的任務,thinking mode 的回答品質明顯更好,而 vRAM 壓力我自己實測兩個模型是差不多的。

Reference

Ollama vs vLLM 比較 / 效能

Kubernetes / OpenShift 部署

模型格式差異

crawl4ai

SearXNG

SearXNG 整合

Tools 整合